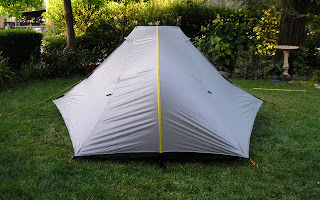
Ultralight tent for the Photographer on the go
I just recently purchased a Tarptent Double Rainbow tent from http://www.tarptent.com. I really like this tent. It weights in under 3 lbs for a two person tent, has two an entry on both sides with vestibule. I was thinking about a one man tent, but many people who would want to join me on a trip don't have their own tent. Furthermore, with the larger size, I can comfortable get my photography gear in the tent with me, which is important, so I can grab my camera quick to catch a photo of that bear that might attack my tent. Alternatively, to keep my gear out of the rain. Setup is rather fast, and as I have done it a couple of times, it's getting faster, just a couple of minutes. This tent can be free standing with trekking poles or be pinned down with the provided tent stakes. I actually upgraded my stakes to MSR's because they seem a bit more sturdy.
This tent is also available with a liner which adds warmth in cooler weather and helps shed away condensation under certain conditions. It was worth the $30 upgrade. I also picked up the $12 Tyvek ground cover to protect my investment. (wash it in cold water to soften up (do not place in the dryer)) the liner, stakes, ground cover, tent and tent pole all fit into the provided stuff sack. This set up is not for those looking for a cheap tent. It is for the Photographer/backpacker who wants to lighten their load because they are carrying 15 lbs photo gear plus what they need to live on for 3 or 4 days in the wilderness. Price total $302.00. This slips nicely into my AARN Rucksack with Photo Balance pockets.
The only part I didn't like doing to prep this tent for rain, was you have to seam seal these tents for rain. Which if you have not done it like me, you should test your work in the yard under a sprinkler rather than on the trail. Seam sealing for those of you who do not know what this is, is sealing the tent seams with a silicon slurry. Many brands actually have you do it because it can be a little messy. I had to do it four times. I kept finding areas I missed. The thing I missed the most is you really need to get under where fabrics overlap and there is a little area water can get under. You need to seal the fabric together. After my 3rd seam seal, we actually got some rain, and I got a little water that dripped in overnight through the bug screen, I really recommend seam sealing both the outside and inside. There are a variety of videos and instructions on the Tarptent website. I recommend using a mix of GE silicone II with mineral spirits (paint thinner) to make your seam seal and not too much thinner so that it is runny. Don't use acetone. To make sure you got it all, run the tent under a sprinkler for 30 minutes. Other than the seam seal this tent is WORTH the investment.
Here is a video of me setting up the Tarptent Double Rainbow for the first time.


No comments:
Post a Comment