24 March 2011

Photographers Outing gear for a three day trip

What do you bring on an outdoor photo expedition?

My pack weight: about 45lbs / 20.5kg with 2 liters of water. 
(about 15lbs / 6.8kg for all photo gear) 30lb / 13.6kg pack without photography gear


Curious what to pack for your 3-4 camping trip on the trail? Here is my camping/backpack gear along
with my photo equipment set up. Attached is a list of gear I keep when backpacking the great outdoors.


Sleeping bag: Kelty 20 deg
GSI Dualist cookset, Spoon and Measure cup

Toiletries pack (TP, soap, asprin, toothbrush, toothpaste, etc..)
Emergency Pack (blanket, first aid kit/bandages, matches, bug repellant, sun block, etc..)
Hand warmers
50 ft of line, stuff sack, OPSak Odor-Proof Barrier Bags, bear bell
Filter system with Platypus bags, Sawyer filter and DIY carbon filter, Hydration bag
Extra clothes (underwear, socks, pants, gloves, hat)
Food 3-4 days (Dehydrated pasta with meat, Indian food w/rice, soup, chili, apple pie, oatmeal, power bars, hot chocolate, tea) Salt and pepper.

Camera Gear:
Canon 7D
Canon 10-22mm f3.5
Canon 24-70mm f2
Tonika 100mm macro 1.8
Neutral Density filters
Cleaning kit
Benro Tripod and ball head with Zeh Pod-Sling
Extra Batteries
Plenty of CF cards

23 March 2011

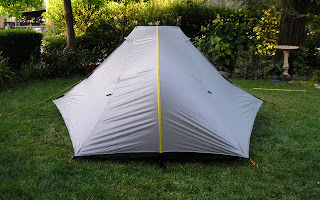
Tarptent Double Rainbow, Ultralight tent with room to breath

Ultralight tent for the Photographer on the go


I just recently purchased a Tarptent  Double Rainbow tent from http://www.tarptent.com. I really like this tent. It weights in under 3 lbs for a two person tent, has two an entry on both sides with vestibule. I was thinking about a one man tent, but many people who would want to join me on a trip don't have their own tent. Furthermore, with the larger size, I can comfortable get my photography gear in the tent with me, which is important, so I can grab my camera quick to catch a photo of that bear that might attack my tent.  Alternatively, to keep my gear out of the rain. Setup is rather fast, and as I have done it a couple of times, it's getting faster, just a couple of minutes. This tent can be free standing with trekking poles or be pinned down with the provided tent stakes. I actually upgraded my stakes to MSR's because they seem a bit more sturdy. 


This tent is also available with a liner which adds warmth in cooler weather and helps shed away condensation under certain conditions. It was worth the $30 upgrade. I also picked up the $12 Tyvek ground cover to protect my investment. (wash it in cold water to soften up (do not place in the dryer)) the liner, stakes, ground cover, tent and tent pole all fit into the provided stuff sack.  This set up is not for those looking for a cheap tent. It is for the Photographer/backpacker who wants to lighten their load because they are carrying 15 lbs photo gear plus what they need to live on for 3 or 4 days in the wilderness. Price total $302.00. This slips nicely into my AARN Rucksack with Photo Balance pockets.


The only part I didn't like doing to prep this tent for rain, was you have to seam seal these tents for rain. Which if you have not done it like me, you should test your work in the yard under a sprinkler rather than on the trail. Seam sealing for those of you who do not know what this is, is sealing the tent seams with a silicon slurry. Many brands actually have you do it because it can be a little messy. I had to do it four times. I kept finding areas I missed. The thing I missed the most is you really need to get under where fabrics overlap and there is a little area water can get under. You need to seal the fabric together. After my 3rd seam seal, we actually got some rain, and I got a little water that dripped in overnight through the bug screen, I really recommend seam sealing both the outside and inside. There are a variety of videos and instructions on the Tarptent website. I recommend using a mix of GE silicone II with mineral spirits (paint thinner) to make your seam seal and not too much thinner so that it is runny. Don't use acetone. To make sure you got it all, run the tent under a sprinkler for 30 minutes. Other than the seam seal this tent is WORTH the investment.

Here is a video of me setting up the Tarptent Double Rainbow for the first time. 


12 March 2011

Canon 35mm F/2 on the Trail


Panoramic, ISO 160, f2.8(mistake) 1/1600 (Pay attention to your settings)
Ok, after finally taking this lens out for a test run, I was happy with the results. I like the feel of a "normal" lens.  I have a 50mm, which a lot of photographers have. Mine is a f1.4. However, I run a ASP-C sensor, so what is normal on say a 5D or a 35mm is not on the cropped sensor.  And like many who shoot with an ASP-C you might think it looks pretty normal to you.  As a 7D owner, and previous owner of a 40D, 20D, and a Rebel 300D, you get use to the focal length of your lenses and until you switch to a full frame, you are always at a loss, without really knowing it. So I decide after an article I read about shooting panoramic images with a normal lens, to find a truer  normal for my ASP-C camera.  (For about the search and options for a normal lens: http://zehphotoblog.blogspot.com/2011/03/going-normal-with-35mm-lens-on-7d-for.html)

ISO 160, f2.8(mistake) 1/800
So I took this out on the trail into the Superstition mountains, in Arizona.  I took a variety of landscape images, including a panoramic. Now I did have to hand hold the panoramic so the results are not that great, mainly because I usually shoot a panoramic on a tripod, with a Nodal Ninja. On this day I didn't bring my extra equipment. I was hiking with some new people, and I didn't want them to have to stop for me, or for me to lose my group as it was my first experience on this trail (Hieroglyphics Trail.) Next time, I will go out on my own, since I know the hike, but temps are already getting ready to hit the mid 90's two weeks into March.  This hike starts in the desert, so the heat factor with added equipment rather sucks. Lucky that day was only in the low 70's but the next day was already jumping into the 80's. (Spring in Arizona, is actually springing from the 70's to the 100's in like 2 to 3 weeks) Anyway, I digress.  So I did take a number of photos, mainly with my newly converted 40D IR. The shots were stunning (ok that's my opinion, but many others thought they were great too.)  I shot a couple of compositions I really liked, but I was rushing and not paying attention to my f/stop which I had at 2.8. Duh! Not good when you want a large depth of field in a landscape shot.  Nevertheless, if it wasn't for my screw up this was a champ for a lens.  

ISO 160, f8(much better) 1/250

The lens makes a little noise, but overall not enough to scare anything off. It focuses quick and accurately. And if you are looking for a decent, fast, and Normal lens for an ASP-C sensor-ed camera, I would definitely recommend this one.  If you can afford the high end version which is the 35mm f/1.4 for $1400, go for it, but if you want something in at about $310, I would jump on this one.

ISO 160, f/8, 1/200


I often will shoot at 160 instead of 100, due to Canon's slightly off ISO's seem to be there prime ISO's which get a little better quality from what I have read.

03 March 2011

Going normal with a 35mm lens on a 7D for Panoramic images.

Searching for the perfect "Normal" Lens for a ASP-C camera under $400.
Salt River Area outside of Phoenix, Arizona. 


I just got my new Canon 35mm f/2 lens from Canoga Camera. First let me say, if you are anywhere west of the Mississippi, I would recommend them over B&H or Adorama (unless you are in California, and you are trying to avoid Taxes). They are in California and you will usually receive it in half the time, and their pricing is competitive. They will charge for shipping, but I have asked them for free shipping, and they obliged.
Now I am an avid panoramic photographer, who does both IR and HDR panoramic images. And as many people who love to learn, I research everywhere I can. I explore everywhere, whether on the net or reading magazines.  While reading Outdoor Photographer in the new March issue, I came across an article about Brandon Riza's panoramic photography and his techniques. I usually shoot many of my panoramic images with a 10-22mm canon EF-S Lens, and still will when I am doing spherical Panos. Riza makes the case for using a normal lens for panoramic images, to get more of the viewer sight of the subject. He is running a 50mm on a 5DmkII. The wide angle far away aspect, so I decided for a landscape panoramic I would go as normal as possible. I started by looking as lenses that would be most "normal" for a 1.6 APS-C sensor. I came across three options that were in my budget under $400.


 I first started with a Sigma 30mm f1.4, which is closest to Normal (50mm) which comes in at about 48mm. This lens is designed specifically for APS-C cameras and does not fit full frame cameras. I found it at Adorama for around $440. I like how fast this lens is. However, after reading up, as much as I could, it seems for many (not all) that this lens has some focus issues. After I had seen this was somewhat a common issue I decided to pass, though I liked it came with a hood. I also read it's a great lens if you use Manual focus, where then it is sharp. The Auto focus on this lens is said to be quiet.       
   
My second choice was a move to the Canon 28mm f/2.8, a bit slower lens than the Sigma 30mm. This image is about 45mm with the ASP-C sensor.  This lens would allow me to use it on a full frame if I ever upgraded my camera. The build quality on this lens feels less than that of the Sigma, but at a price tag of only $259.00. Many positive reviews of this lens, but something that popped up in many reviews, was that there was sharpness  loss toward the edges of the image. I wanted to find something that could have as much sharpness as possible, since I do stitching of images.  So I decided to search some more.  


Finally, I checked out the Canon 35mm f/2.  This lens's drawback is that the lens doesn't have a USM motor, so it's not quiet when in auto focus.  If you are in a room with noise, it is not a problem. However, if you are in a room that is silent, this noise will stick out. But for my needs, that is not an issue. This lens runs at 56mm on the ASP-C sensor. So out of the three lenses, it's the least normal, but within the range, so I could handle the small difference. The best thing I read in most reviews, is that this lens is sharp across the entire image. This lens is also faster than the 28mm f/2.8. Furthermore, I read the color from this lens is in addition, better than the canon 28mm. At $305 from Canoga Camera, I thought this is the lens for me. Being in Arizona, it got here in two days. Better than the week or more it takes from B&H or Adorama.  I do like both those store, but sometime I just can't wait to play.  

The people at Canoga Camera were helpful and gave me free shipping when I asked, because I told them I would prefer to shop with them. Mainly, because the wait for being located on the west side of the US becomes too long, when everything seems to come out of NY. I will write a review of the 35mm f/2 once I take it out for a good test run. So check back in later if this lens interests you for Panoramic or general photography. If you are interested in knowing some specifics on this lens, drop a question or interest in the comments, and I will do what I can to answer your question.

PART: 2 Canon 35mm on the Trail 

Speeding up your Lightroom 3 production with Paddy and a BFC2000 controller

The fast way to do Lightroom 3 controls 

If you are a full-time photographer and don't have a software such as Lightroom 3, this is the ideal way to manage and adjust photos quickly for basic adjustments. This should be a standard for all Pro photographers with Photoshop to do highly detailed work. And with the Paddy software and BCF controller you can greatly speed up your production time on adjusting large numbers of photos.


Black BCF2000 Controller from Behringer
About a year ago I came across an article for Patty, a software to allow you to use a midi controller, to control the difference sliders in Lightroom. So in researching and reading up at the Paddy for Lightroom site, I found they geared it to a specific midi controller. Using a BCF2000 controller with the Paddy software it will allow you to control the sliders in Lightroom. The software can be used  for other external keyboard controllers, but from my experience the BCF2000 is an ideal choice. After having used this set up it has greatly increased my speed in making adjustments as you just slide the bars up or down to adjust your main adjustments, such as: exposure, recovery, fill light, blacks, brightness, contrast, clarity, vibrance, and saturation. Actually, any of the settings that you use regularly  can be programmed the sliders. You can also have different levels so that the sliders will do different tasks, depending on what program level you're on. You also have a number of buttons and dials on the BCF2000 controller which allow you to add controls to those items. On the knobs at the top of the controller I have various things set such as noise reduction controls, and sharpening controls. And if you don't like the results you can press on the knob and reset to the original setting. I have set the buttons above my sliders to be a reset button to reset the slider back to its original setting. This way if I make a mistake, and I don't like the results,  with a quick press the button I can go back to where it was if I made a mistake. When I first started Paddy the software was a challenge  to figure out, but they were making daily updates, so now setting up the software is relatively easy. The benefit is you can program each slider knob and every button to your desired needs to work in Lightroom 3. This is not designed for Photoshop as the software designer uses Lightroom. It would be rather cool if it could be used for the camera raw settings in Photoshop, but he has not moved in that realm.
White BCF2000 Controller from Behringer

This set up really speeds up production as I don't have to go on each slider in Lightroom with my mouse and individually slide the virtual digital slider. You can always keep your hands on your midi controller, and once you get used to where all your sliders and knobs are you can do most of your commands without even looking at your controller. So when you need to increase your exposure or maybe adjust tint all you have to do is grab that slider or knob and adjust it quickly. The cool thing is with the BCF 2000 controller is now if you were to slide something in the virtual controller in Lightroom, the sliders on the controller are motorized and moved to replicate your adjustments on-screen. This is a powerful program and tool if you're doing a great deal of images within Lightroom, where you're working on the images individually. It has greatly sped up my photography production time. I can easily slide my way into the adjustments I need. I highly recommend this set up to anyone who does a lot of image adjustments within the Lightroom software. The BCF 2000 controller can be found online at places like B&H photo video for about $179.00. Not very expensive considering how much time you could save.

02 March 2011

Free Video Stream with Vincent Laforet on Chase Jarvis: Live

Vincent Laforet on Chase Jarvis: Live
Chase Jarvis: live, takes an inside look when talking to Vincent Laforet. They sit and discuss the in's and out's of film and video production. Vincent talks about his move from photography to video direction. He talks about his technical background moving into the creative side and letting go of the technical to get the best out of his creative. He and Chase discuss using the correct camera for the job, in other words, a red is not always the best camera sometimes it might be a 5D or something else. The lesson here is there is no one size that fits all, and knowing your equipment is important to get the best out of what you have. They both talk about how learning goes on, and how they develop and evolve into new forms and areas within their expanding fields. Part of really growing and learning is to be comfortable not knowing and let the ego go. This will allow you to ask questions and gather information to develop new areas of interest in the field of photography and video. They also talked about the need to et past the stigma, that we have to know how to do everything. We don't have it all, but we can surround ourselves with the people who do and the understanding of techniques can help you but not knowing will not prevent you. They also discuss the need to hustle to get the job, but that it's not a bad thing. You just have to be driven. There's so much competition if you want it, you have to go get it. The only down fall I saw (or heard) was that they were having some audio difficulties with crackling that was rather annoying. They seem to fix it for a while but then it came back and went. Once you get past that it was well worth watching.

David duChemin


This was a very interesting live stream that I would have recommended to anyone who has an interest in photography or video to catch. Vincent will be doing a three day FREE Workshop: HDDSLR - Moving From Still to Video with Vincent Laforet. The workshop starts Friday, March 4 and goes through March 6. You can register online or pre-purchase the course online for $99. The creativeLIVE workshops are free and give great information, or if it's a interview a can be very inspirational as it makes you want to grab your gear and try something new. If you're not a member of creativeLIVE I strongly urge you to join for their free workshops. Chase Jarvis is a wealth of information, and he brings others which have a great amount of information to aspiring photographers and videographers.


01 March 2011

Build your Own Continuous Fluorescent Lighting (Softbox)

DIY Continuous fluorescent lighting

A little time ago I went to a Clay Blackmore workshop on portrait lighting with continuous lights. He had a really nice lighting set up which consisted of a couple of softboxes that were made up of Westcott spiderlites. Having come from a background of using strobes this was new to me, but I like the options and the ability to move my lighting around and see exactly what my final effect would be without having even take a shot. So I set out to create my own spiderlite kit. So I pulled together a couple of softboxes I already had and made a modification to allow a new spiderlite fluorescent set up.


 First, I started with my speed ring and traced out a circle on a piece of aluminum. I cut out the aluminum with some tin snips and then sanded the edges. After fitting the aluminum to the speed ring, I found the center of my circle and drilled a 2 1/4" hole in the center. This was to allow my four-way connector for my fluorescents to connect to the plate. From Westcott I used their  1 to 4 light adapter from photobasics.net. Dropping the light adapter into the hole, I then screwed the adapter into the backing plate to secure it. Once it was all fitted, I placed the aluminum ring back into the speed ring and attached the screws which are part of the speed ring. Then I screwed on a light adapter to the back of the unit which has a switch. Then I added my softbox.

The conversion for my softbox was only about $45. Ideal lighting for this is using 27W (100W equivalent) daylight fluorescents (2 for about $4 at Home Depot). Having used these for several months I am happy with the outcome and they work great. It's a simple solution if you already own softboxes and want to convert them, yet be able to still convert back to strobes. For small portrait settings, this setup works great. And if I'm in need of a great amount of power I just convert back to my strobes by just popping out the adapter plate from the speed ring and replacing the strobe adapter. I have an inexpensive set of softboxes, which are flashpoint II units from Adorama. If you built the entire thing from scratch you would probably save about $200 this would include the stand, softbox, and parts to make the continuous lighting head.


Le Zot IR Camera Conversion

I was having one of those days, and on this day I found a speck of dust on my sensor. I broke out my Delkin sensor cleaning kit to clean off the sensor. With the lighted scope, I found the piece of dust and move forward to remove it with the dust swab. Unfortunately, to my dismay, the dust wouldn't move. Damn, somehow a small particle of dust that look like a giant hair in a photograph got under the sensor filter. So now I had to send it off to Canon for deep cleaning. To my dismay even though I told them where the dust was they just did a regular cleaning which was  done by me, and charged me 50 bucks. Then they told me it had to go in for repair to get the particle of dust out from underneath the sensor filter. This was going to cost about $650, and they told me for just a bit more I could get a refurbished 40D, which is what I had sent them. I wasn't ready to slam down $650 on basically a backup camera, since I own a 7D. However, I thought I would search around for someone who might be able to repair it.

Just a quick test photo in front of the house.

In my search, I came across a small repair company in Burlington, Vermont. The company's name was Le Zot. So I e-mailed them asking them what the cost of the repair would be to remove the filter, clean it, reinstall it and sent me back my camera. Peter at Le Zot promptly replied to me $250. I thought that was a much better deal.  Then I noticed they also did IR conversions, which I had thought about doing for some time. I e-mailed Peter back later asking the cost for an IR conversion, plus taking the dust out. And I found out it would only cost hundred dollars more and that was with an internal R72 infrared filter. So I figured what the hell, I will go all the way with the IR conversion. As it was sent ground to them, and it took about a week and a half to do the conversion, and then ground coming back, it took about three and half weeks. Even so, this is not my only camera, so the time it took was not critical, though I was excited to get my camera  back, to try out the new system. When I finally received my camera with the IR conversion, I pulled out my 50mm lens and gave a test run. I was happy with the results, as they made the necessary white balance adjustments and set the color profile to what they thought was optimal.  And I was elated with the first images I took. They did change the image settings from RAW to JPEG, so I decide to switch  back o RAW.  In RAW the images come out as you would expect from a infrared image, with a red hue which would need to be converted in Photoshop. So with some experimenting and reading up on the best way to convert, I could  convert my images to what a typical IR would look like. The nice thing about when it's set to JPEG the images come out automatically to what I'm looking for, but under RAW, a conversion needs to be done. So with that, I will have to set up some actions or presets in order to get a baseline for my IR images.


Peter at Le Zot was very helpful, entered all my questions promptly. They did great work and I would highly recommend. Turnaround time can be a little faster if I had upgraded my shipping but for the work that was done, it was well worth the wait.

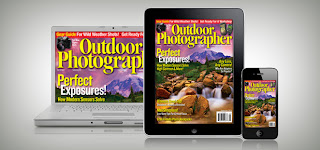
Outdoor Photographer Magazine, Digital In, Paper Out

Outdoor photographer magazine, why it's better to get a digital version rather than a newsstand paper version.


I recently started focusing on my landscape photography, and I decided to get a subscription to Outdoor Photographer for news and reviews of equipment I may like to research for purchase at some point. I also like the idea of getting information of great locations to photograph and places to go. I went to the local Barnes & Noble to check out Outdoor Photographer magazine, which I've had a subscription a number years ago. In picking up the magazine I was very disappointed to see that the magazine had started changing the paper that they print on and decided to go with a quality which had drastically dropped. When looking at these stunning images by other photographers, the image quality was lost on poor paper and printing that Outdoor Photographer magazine now uses. I understand higher quality printing and paper costs more money but this degrades the images in their magazine.
Zinio app


Owning an iPad, I decided through the Zinio App, I would download the Outdoor Photographer magazine. Knowing that the images on my iPad always look great I was hoping the quality of the magazine would show through, and it does. The images look stellar and you're not left with lousy printing on lousy paper. It's unfortunate Outdoor Photographer would print on anything less than what would make their images look good. Maybe they've decided to move to a format which would do the photo's justice. However, in doing so, I think they are leaving many out who cannot afford digital equipment to read a magazine. Maybe one day everybody can afford an iPad, but in this day and age I don't think that is yet possible. So those who cannot afford to have a portable digital format are left with a meager magazine when it comes to image quality. I think they're doing a disservice to their readership, and it's unfortunate to see. On top of it, a subscription to Outdoor Photographer's paper version is more expensive than the better looking digital version. Granted you don't have that paper version which they have to print. However, the quality print is not worth the paper it's on. I like Outdoor Photographer magazine. It just saddens me that they would reduce her quality to such a low for the stunning photographs that they print on their pages.


I highly recommend if you own an iPad definitely spend less money and get the digital version of this magazine, as it's the only way you can see a quality image, in high-resolution. If you don't have iPad am sorry to say you're losing out on the beautiful images by quality experienced photographers. I would recommend writing to Outdoor Photographer and asking why they would sacrifice the quality in a photography magazine whose livelihood is based upon the images they show. As I like flipping through a magazine digital versions are not my first choice. However, I have a feeling that in the future this will be the way most publishers will go. It means less overhead and more profit. Though many may not see it this may be the beginning of the death of print in a paper version. Even so, the one constant is that change is inevitable.